

How to Tighten a Loose Moen Single-Handle Kitchen Faucet
How to Tighten a Loose Moen Single Handle Kitchen Faucet Dealing with a loose Moen kitchen faucet handle can be frustrating and inconvenient.
Everyday tasks, from washing dishes to making coffee, can become tedious when your faucet isn’t functioning as it should.
A loose handle hinders your kitchen work and triggers constant dripping, leading to water waste and higher utility bills.
However, there’s no need to worry or call for professional help. I was tightening a loose Moen single-handle kitchen faucet.
This guide will provide a simple and quick solution, walking you through the steps required to secure your kitchen faucet handle, thereby restoring convenience and efficiency to your kitchen operations.
So, why spend a fortune hiring professionals or put up with an annoying faucet when you can fix it yourself? This DIY guide will help you address the issue in no time.
Keep reading to learn how to tighten your loose Moen single-handle kitchen faucet and regain control over your kitchen tasks.
How to Tighten a Loose Moen Single-Handle Kitchen Faucet in 10 Steps
Step 1: Determine the type of cartridge your faucet uses
Before you can embark on the repair process, it’s crucial to understand the type of cartridge your Moen single-handle kitchen faucet uses.
The cartridge type will guide your next steps and ensure you have the right tools for the job. Moen typically uses one of two types of cartridges: 1200 or 1225.
Knowing the difference between these two can save you time and prevent potential damage to your faucet during tightening.
In the following section, we’ll help you determine your cartridge type and understand its role in your kitchen faucet.
Step 2:Remove the handle and other cover pieces.
Depending on your faucet model, remove the metal clip holding the cartridge in place or unscrew the threaded retaining cap.
Carefully pull the cartridge out and inspect it for any signs of damage or wear.
You can proceed to the next step if it is in good condition. If not, consider replacing the cartridge before reassembling the faucet.
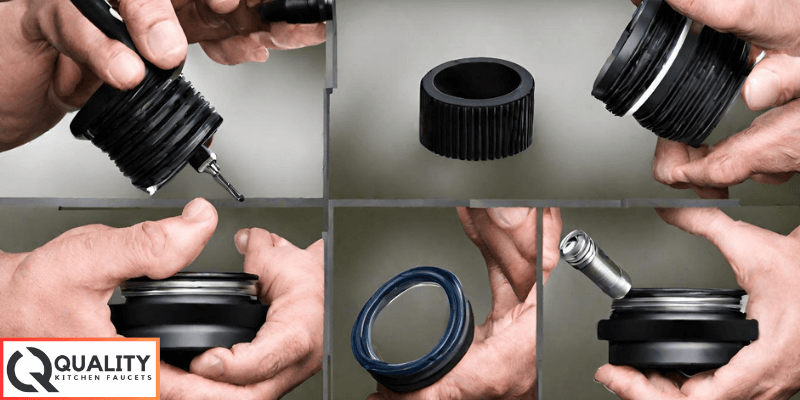
Step 3: Use a cartridge puller tool to remove the old cartridge
This step involves scrutiny of the cartridge compartment. After removing the old cartridge, it’s crucial to check the compartment for any signs of sediment buildup, mineral deposits, or damage that may have caused your faucet to loosen.
Use a flashlight for a better view. If you spot any debris, clean it out using a cloth or a small brush. Careful cleaning of the cartridge compartment ensures smooth operation of your faucet once it’s reassembled.
Step 4: Inspect O-rings for signs of wear and replace if needed
Once you have thoroughly inspected and cleaned the cartridge compartment, it’s time to reinstall the cartridge.
Ensure it’s correctly positioned before securing it with the retaining clip or threaded cap. Following this, reassemble the handle and other cover pieces. Make sure everything fits together perfectly to avoid any mishaps later.
Finally, test your faucet to confirm that the handle is no longer loose and that the water flow and temperature are functioning correctly.
You have successfully tightened your loose Moen single-handle kitchen faucet with these steps.
Step 5: Lubricate the new cartridge and O-rings before installing
Once you’ve lubricated and inserted the new cartridge and O-rings, it’s time to reinstall the handle. Ensure that the handle is positioned correctly and is firmly tightened to prevent any future looseness.
After reassembly, it’s crucial to test your faucet. Turn on the water and check the flow and the handle’s movement. If your faucet functions smoothly without any leakage or loose handles, congratulations! You have successfully tightened your Moen single-handle kitchen faucet.
If you encounter any issues, repeat the necessary steps and double-check your work for skipped or improperly executed steps.
Step 6: Put the cartridge into place and replace all cover pieces
After completing the above steps, verifying that the problem has been resolved is vital. Run the faucet and check for any signs of leaks or a loose handle.
Remember, the handle should move smoothly with just enough resistance. If the handle is still loose or the faucet continues to leak, retrace your steps and ensure each step was performed correctly.
Sometimes, you may need to repeat the process or consider replacing other faucet parts. But if everything is in order, pat yourself on the back for a job well done! You’ve successfully tightened your Moen single-handle kitchen faucet.
Step 7: Does it feel tighter now? If not, double-check your work or consider seeing a plumber.
Once you’ve confirmed that the faucet is tightened correctly and functioning optimally, it’s time to celebrate your successful DIY plumbing project.
However, remember that regular inspection and maintenance can prevent future issues. Make a habit of checking your kitchen faucet periodically for any signs of looseness or leaks.
By doing so, you can address any minor issues before they escalate, maintain a smoothly functioning kitchen faucet, and save on costly repairs in the long run.
Step 8: Maintenance tips to prevent looseness in the future
Regular cleaning and inspection are essential to ensuring the longevity of your Moen single-handle kitchen faucet. Dust, grime, or mineral deposit accumulation can lead to a loose handle over time.
It’s recommended to clean your faucet at least once a week with a non-abrasive cleaner. This will preserve the faucet’s finish and keep it looking new.
Monthly inspections for loose parts can also help you catch minor problems before they become significant.
Step 9: When to call a professional for replacement or repair
Step 10: Recognizing the Need for Professional Intervention
At times, despite our best efforts and exhaustive DIY remedies, the problem with the faucet may persist.
This could be due to underlying issues requiring more skillful intervention or replacing the entire unit. If the faucet continues to leak, the handle remains loose, or you encounter difficulties in executing the steps, it’s advisable to call a professional plumber.
They have the necessary expertise and tools to accurately diagnose and rectify the problem, saving you time, effort, and the potential cost of further damage due to DIY missteps. It’s all part of being a responsible homeowner.
Conclusion
Tighten a loose faucet without professional assistance.
Always turn off the water supply before attempting any repairs, and use the proper tools.
With a bit of time and effort, you can prolong the life of your faucet and avoid any potential water damage to your kitchen.
Additionally, by promptly fixing minor issues like a loose handle, you can save yourself from more significant problems and costly repairs.
Don’t hesitate to contact us with further questions or concerns regarding your faucet or other home maintenance issues. Thank you for reading!
FAQs
How do you tighten a single-handle kitchen faucet?
Tightening a single-handle kitchen faucet involves identifying the faucet’s model, turning off the water supply, disassembling the handle, pulling the adjustable ring or retaining screw, and then reassembling and testing the faucet.
Why does my faucet handle keep coming loose?
A faucet handle may keep coming loose due to wear and tear, the accumulation of grime and minerals, or a loose retaining screw that needs tightening.
Why does my faucet handle spin all the way around?
A faucet handle may spin all the way around due to a worn-out cartridge or a loose or broken handle screw.